3.2 Communication Tools
This book will provide step by step more communication tools which could be used in a university setting.
- Communication Exercises
- Training Perception
- Working on the Blind Spot - Giving and Receiving Feedback
- Training Presentation Skills
- Conclusion of the Session
- 4-Sides Model
- The World Cafe
Communication Exercises
You find here some methods for developing communication
Training Perception
Exercise 1: Selective Perception - Gorilla Experiment
Application
- Show the video "The Monkey Business Illusion" by Daniel Simons: https://youtu.be/IGQmdoK_ZfY
- Have the students count how many times the white-clothed players pass the ball.
Objective
The students will experience how our perception is filtered subjectively. And we do not even notice that.
Reflection
- What does this mean for our communication?
- How is the way we perceive each other in everyday situations filtered by our habits, expectations, Interpretations, judgement, beliefs, and current condition?
Exercise 2: Perception, judgement and interpretation
"Right" and "Wrong" are not the categories that help us in our personal development. The same is true of good and bad judgements. However, if you observe yourself in everyday situations, you may notice that such evaluations are often found.
Take the simple question “How do you feel?” for example. Common answers are “Good” or “Not so good”. A truly descriptive answer to the questions (e.g. happy, a bit weary, stressed, relaxed) is rather uncommon.
On the one hand, perception is subjective and on the other hand, it is always influenced by situational factors.
Take a lecture for example, which you found awesome yesterday because it was presented slowly and thus well understandable for me. On another day, when I have a headache and want to get out of the warm room as quickly as possible, it could possibly be too slow and too tiring for me. Or maybe a student speaks far too quietly for me, but at just the right volume for the person sitting next to me.
Discovering communication is not about doing things right or wrong but about getting to know more about us, the way others see us and how we perceive the world. A useful exercise is therefore to practise describing - without evaluating and without interpreting.
Application
To do this, you can either prepare slips of paper with statements or have students write down their own sentences and put them in order.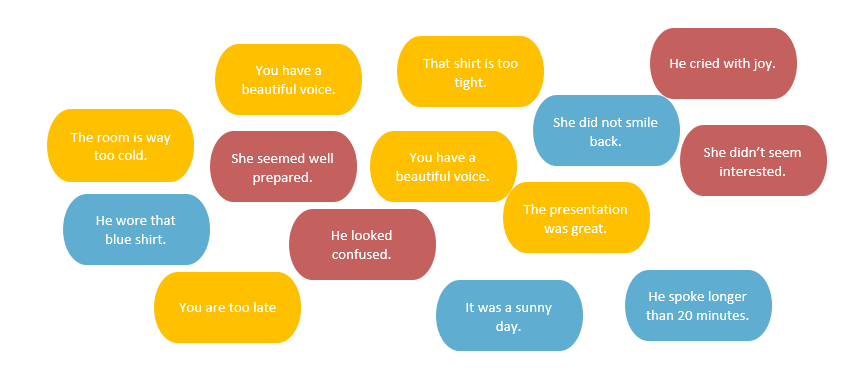
|
Perception |
Judgement |
Interpretation |
||||
|
|
|
Objective
The students are aware of the difference between perception, judgement and interpretation and can assign statements to the three categories.
Next step
Students pay attention to evaluations and interpretations in everyday life. Everyone reports on an experienced situation that has stuck in their memory in the next session.
Working on the Blind Spot - Giving and Receiving Feedback
The comparison of self-image and external image is a necessary requirement for the development of communicative skills. Feedback is the only way for us to learn about our "blind spot" (the unconscious part of our communicative behaviour, see Johari Window Model) and thus reduce it.
Giving feedback is not easy. Giving methodical feedback usually takes more than two lessons, and it requires patience and focus on the part of the teacher. Often we are so stuck in our everyday patterns, such as
- "Do I like this or not?"
- "What did he mean by that?"
- "How am I supposed to understand this?"
that we have to reflect on our thinking in order to be able to engage with giving feedback. Therefore, be sure to start with yourself and try out feedback in your everyday life (See here for more details regarding feedback).
What is feedback?
- It is a gift one is free to accept or not.
- It is descriptive.
- It is honest.
- It is subjective.
- It is concrete.
- It is direct.
- It is prompt.
- It is desired.
- It is constructive.
- It is balanced.
- It is referring to behaviours.
And what is it not?
- It is neither a judgement nor an assessment.
- It is not forced.
- It is not interpretive.
- It is not generalising.
Attention: Many students confuse feedback with criticism and want to hear “what they can do better”. But one of the most important goals of feedback is to recognise one's own strengths, not just to improve what is supposedly bad.
How to give feedback?
To introduce feedback and a real feedback culture in the course, it is useful to visualise the most important points and have them visible on the whiteboard or wall.
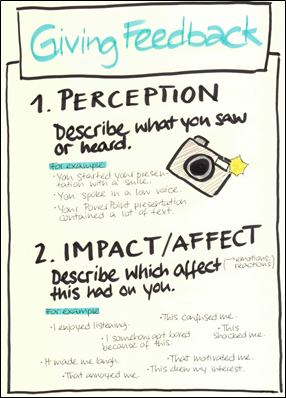
When giving feedback, it is the task for the feedback givers to
- Describe only
- What did you see? What did you hear?
- As exact as possible.
- Make it “photographable” (this avoids interpretations, assumptions and judgements)
- State the affect on their selves:
- How did it effect you?
- How did you feel?
- Giving some examples (on the whiteboard) can be helpful:
- It confused me.
- I had fun listening.
- It drew my interest.
- I got bored.
- It distracted me.
- It made me laugh.
- It shocked me.
- It motivated me.
- I enjoyed listening.
- It annoyed me.
Many curricula include student presentations. These are good for introducing methodical feedback in the group.
What methods of giving feedback can be used?
1. Unstructured Feedback
Objective
The students know the methodical steps for giving feedback. They can give feedback in a non-judgemental and constructive way with preparation.
Procedure
- The students give their presentation.
- The facilitator or teacher asks the students questions about how they have been and how they feel. This step is crucial. It gives space for the presenters' need to share. If you skip this, it is more likely that they will feel the need to comment, explain or justify during the feedback.
- The seminar group gives feedback to the presenters. Here, the students can take over moderation. Make sure that the presenters who receive feedback do not justify or apologise.
- The facilitator or teacher gives feedback. Facilitator feedback often pursues a didactic goal. Therefore, it can contain hints and suggestions, such as "Next time see if you can reduce your keyword concept: Formulated sentences can tempt you to look at the page a lot."
2. Structured Feedback
To enable even more detailed feedback from the group, there is the method of structured feedback. An additional advantage of this method is that the feedback givers additionally train their perception by focusing on specific areas.
Objective
The students know the methodical procedure for giving feedback as well as four feedback anchors or feedback categories. They are able to give feedback in a non-judgemental and constructive way.
Procedure
The so-called feedback anchors (categories written on cards) are distributed either to individuals or to groups, each focusing only on the corresponding category. The presenters can also distribute the anchors him or herself. The feedback anchors are redistributed before each presentation. The task for the feedback givers is to focus on their anchor while observing and giving feedback.
For example, these feedback anchors can be used for giving structured feedback for a presentation of students:

1. Body (nonverbal means)
- Facial expression
- Gestures
- Proxemics - the way a person moves in the room
- Eye contact
2. Speaking (paraverbal means)
- Voice
- Tone
- Accentuation
- Tempo
- Pauses
- Melody
- Volume
- Pronounication
3. Content
- Rigour
- Structure
- Emphasis and focus
4. Language (verbal means)
- Choice of words
- Sentence structure
- Vividness (examples, metaphors)
Training Presentation Skills
Presentation skills training can be particularly well integrated into university teaching. In many subjects, student presentations are already part of the semester routine. Properly guided, they can promote not only academic knowledge but also communication skills. A good presentation begins with preparation. Therefore, you should already support the students methodically during the preparation. The following steps to prepare a presentation can serve as a structural aid for students, e.g. in the form of a handout.
Preparation of a presentation
- Analysing the situation (speaker-listener-occasion).
- Think about the situation for which you are preparing your presentation. The design of your presentation depends largely on this.
- Finding a concrete topic
- Write down your concrete topic once.
- Write down the objective of your speech. What do you want to achieve with the audience (e.g. convince, inform, motivate, call for something)?
- Gathering material
- Gather all the information (e.g. books, specialist texts, articles, online sources) that is relevant to the topic, the formulated goal and the listeners.
- This usually means creating an initial concept containing important ideas, models, theses, arguments, and examples.
- Selecting the material
- Select what can be included and what can be deleted, taking into account allocated speaking time, objective and audience.
- Arranging the material
- On the one hand, prepare a rough structure of the presentation (classical in the sense of introduction, main part and conclusion).
- On the other hand, prepare the internal structure in terms of logic, such as sequence of evidence and links between ideas.
- You can for example state the most critical or strongest argument as the last. However, in some cases it might be useful to structure the presentation from the specific (example) to the general (concept).
- Make corrections
- Shape the presentation with examples, quotations, visualisations, and media content.
- Check the relationship of the parts of the presentation (introduction, main part, conclusion) to each other.
- Delete unnecessary parts (with regard to your objective).
- Integrate formulations
- Develop ideas on the introduction and conclusion of the presentation as well as transitions between the different parts.
- Develop ideas on language style and rhetorical elements. Please keep in mind that formulated sentences should be the exception (e.g. as an opening sentence or at the end or if using quotations).
- Develop a keyword concept/manuscript
- The keyword concept should contain as few formulated sentences as possible, but should serve as a structural aid and support for your thoughts. Use key points or catchwords and keep reducing as you work on them. Please avoid memorising.
- Rehearsals (with the help of the keyword concept)
- Make at least one rehearsal or as many as you think are needed.
- Ideally, you rehrease on different days.
- Try to deliver the presentation anew each time.
- Use new formulations, do not repeat what you have learned by heart.
- Re-think your thought each time. Avoid using the same stresses, speech melodies, pauses, etc.
- Imagine your audience anew each time. You can ask family and friends if anyone has some minutes to spare to listen to your presentation.
- Time your speech and pay attention to the allocated presentation time.
Conclusion of the Session
Reflection
At the end of the session, it is useful to give the students the opportunity to express themselves one more time and to take personal notes of what they have experienced.
Objective
The students finally reflect on their feelings and impressions. They verbalise new insights.
One possibility is to let the students write down on a whiteboard or flipchart answering the following questions:
- What do you take with you?
- What insight did you gain?
- How did you feel?

It is recommended to collect all the contributions on a whiteboard or a large piece of paper. In this way, everyone can also reflect on the insights and thoughts of the others.
Course feedback
A practical method for course evaluation is the five-finger feedback.

It can be used both in writing/drawing (and thus rather anonymously) and orally (in smaller groups) by showing the appropriate fingers.
4-Sides Model
|
Field of application |
Communication Intercultural Training |
|
Resume / Brief description
|
This activity is based on the 4-Sides Model by Friedemann Schulz von Thun. |
|
Target group
|
Students Lecturers Entrepreneurs Colleagues of the same company or work team Colleagues working in intercultural contexts Professionals of different area |
|
Group size |
There is a minimum number of 1 participant for this exercise. The ideal group size is 12-20 participants. |
|
Objectives |
The activity has the objective
|
|
Requirements
|
Material
Time
|
|
Implementation - Guidelines
|
1. Preparation
2. Process
3. Debriefing
|
|
Template |
Handout for individual work: Handout_Offline Reflection and Discussion.pdf |
|
Additional format/references |
Thiagarajan, S. (2012). More Jolts! 50 Activites to Wake Up And Engage Your Participants, San Francisco: Pfeiffer.
Thiagarajan, S. (2016). Interaktive Trainingsmethoden: Thiagis Aktivitäten für berufliches, interkulturelles und politisches Lernen in Gruppen (3. Auflage.). Schwalbach: Wochenschau Verlag. |
The World Cafe
|
Field of application |
Guided larger group conversations and reflections
|
|
Resume / Brief description
|
Making the informal formal and collecting joint knowledge of the participants is the objective of a World Café. Its logic is to encourage a reflection along 3 question rounds. The first round starts with a rather generic question and then is followed by more concrete ones that are oriented to find concrete common results.
The methodology is used for group reflections that want to integrate all participants. It is a very interactive format in which participants exchange on the questions based on their knowledge. It assures that everybody gets a voice and that communication is assured in an egalitarian way. It takes out of the conversation hierarchies (e.g. between students and teachers, between R&D organisations and the community, between teachers) and focuses on the connection of ideas and suggestions.
The World Café can be used
|
|
Target group
|
|
| Group size
|
Minimum 12 - up to 300 people and more |
|
Objectives |
The World Café aims to
|
|
Requirements
|
In case of online realisation, the requirements need to be adapted. Working e. g. with Zoom break-out sessions and mural board documentation provide a good alternative.
|
| Time
|
20 minutes for each question round, minimum 1 hour plus the introduction and explanation of the purpose of the World Café, its methodology, rules and roles, and feedback of findings (altogether minimum 1.5 hours) |
|
Implementation -Overview |
The methodology is realised in three main organisational steps.
|
|
Implementation - Guidelines
|
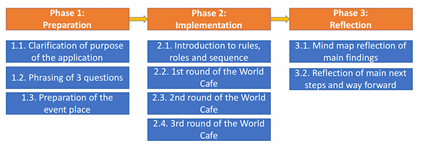
The preparation has to be adjusted to the target group and the context in which it is applied. When working as university staff with external actors, official invitations and procedures should be applied. For internal reflection e.g. with university and department staff, the format can be applied in a joint meeting. In a student class it also can be applied as a didactical instrument. In all 3 application formats there is a sequence of preparation to be considered:
1. Preparation
1.1. Clarification of the purpose
The World Café can be used for e.g.
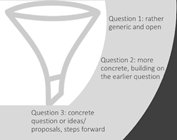
1.2. Phrasing of the questions
Phrasing suitable questions is key to reach the purpose of the World Café. The logic of phrasing follows a funnel logic. It starts with a rather generic question to get the communication going, then a more concrete question related to the purpose of the meeting, then a final question that provides the opportunity to get a concrete outcome.
1.3. Preparation of the event
This includes invitation but also setting up the space:
2. Realisation of the World Café
2.1. Welcome speech and introduction to the purpose and sequence
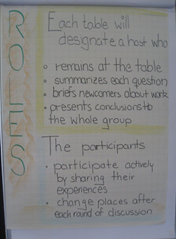
One of the key questions that can be asked to the audience is: “Where do you have most informal exchange on an official event” The answer in general is: “During the coffee breaks.” The World Café has the logic to encourage informal communication and exchange in a formal structure. It is relevant to give a short overview of the structure of the World Café (3 questions, groups are mixing, and tables are changed after each question, each reflection on a question is e.g. 20 minutes). The explanation of rules and roles are relevant finally (in the first-round group at each table chooses one host who stays at each table through all question rounds, everybody takes the markers and doodles and draws on the table cloth, every comment is documented or visualized on the table cloth etc.). Then the group is asked to find themselves up at different tables before the first round of question starts.
2.2. First round of questions
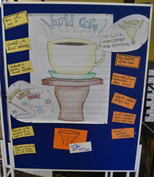
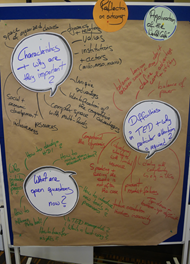
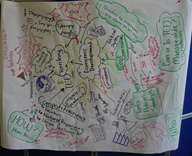
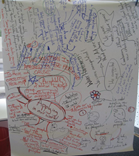
The first round of questions is beginning, and answers are getting documented in one colour (e.g. green). Answers to the questions get exchanged and documented on the table cloth (using symbols and graphics, not only words is encouraged). At the end of the 1st question round each participant is asked to look for a new table with a new group of participants (e.g. students). Only the selected host stays at the same table to brief the newcomers.
2.3. Second round of questions
Before the second question is presented, the host presents the main answers from the first round of reflection (only 2 minutes to wrap up). Meanwhile, moderators take the green markers from the table and exchange it with a new colour (e.g. red). Then the second question is presented to the participants. The reflections on answers related to the second question get then documented by the participants in a different colour (e.g. red). At the end of the second question round each participant is asked to look for a new table with a new group of participants. Only the selected host stays at the same table to brief again the newcomers.
2.4. Third round of questions
Before the third question is presented, the host presents the main answers from the second round of reflection (only 2 minutes to wrap up). Meanwhile, moderators take the red markers from the table and exchange it with a new colour (e.g. blue). Then the third and last question is presented to the participants. The reflections on answers related to the third question get then documented by the participants in a different colour (e.g. blue).
3. Reflection of findings
3.1. Summarising main findings
The hosts at each table are asked to give a synthesis of the main answers on each question at their table. The results are documented in a mind map (on a pin board or flipchart).
3.2. Reflection on main steps forward
It is important to reflect on how to make use of the information collected or how to move forward as a next step. The momentum that is created provides the opportunity to become well documented and to make use of (e.g. through the realisation of the ideas or further planning steps).
|
|
Example of application |
Local Economic Development Forum in a city (and in a Student) for a reflection on Local Economic Development
The following examples come from a Summer Academy on Economic Development in Germany for experts and practitioners and from a student course at the SEPT Master Course in Germany. In both events the main topic to reflect on is local economic development (LED). The logic of the World Café was oriented to 1) Identify common knowledge on what LED is all about 2) Reflect about key challenges in LED in a respective city/place 3) Identify key success criteria for LED
Designing a pin board with main objectives of the World Café and application of examples (if existing)
Students and local practitioners were provided examples of the use of the World Café in different projects and local events in the world. Along this board also the objectives of the world café logic were explained. Stressing out the logic of making the informal talk formal is a key aspect of the World Café as well as making use of common knowledge and getting to know each other through discussing and reflecting on concrete targeted questions.
Description of the rules and roles of the World Café sequence In the local city workshop/training the description of the main rules and roles were provided. This can be done on a pin board, flipchart or on a PowerPoint. Presenting it in a nice visualised way encourages the participants to also visualise on the table cloths and to make use of symbols while jointly reflecting.
Presentation of one question after the other in the sequence
In a local economic development event with stakeholders a pin board to demonstrate the questions was used while in a student class a PowerPoint was used to present the three question in a sequence.
Summarising the discussions from the different round tables A mind map is a good way to document the main findings of the discussions. The hosts are asked to come up with their main important findings which are then documented directly on the mind map. It provides a good joint reflection of the large group.
Documentation of the results The summary reflection provides a good overview of the overall discussion. But each tablecloth table also entails many additional information. In a conference, these additional findings can be documented in a written format or photographed as documentation.
The events with the World Café are organised by very different stakeholders in very different communities. In large public events, the core group who organises the World Café should make sure to have a number of moderators with them who visit the different tables and who make sure that people are not only talking but also documenting their reflections on the tablecloths.
|
|
Templates, Graphics for download
|
|
|
Additional format/references
|
|